Digital Battenburg Lace

This tutorial is written for PSP6 but it can be done with PSP5 if you have the Dividers font and are familiar with the deformation tool. Results are better with PSP6 or above, especially if you have to do complex or drastic deformations to your design.
CandeeKis has an excellent tutorial for making lace doilies that complements this tutorial wonderfully. You can find another fill for the lace and another BladePro preset for the embroidery edging there too.
Ronni has done a wonderful follow-up tutorial to this one, a Battenburg Lace Angel. Do this tutorial first and then go over to her site to make the angel.
For this tutorial you will need to download and install BladePro (available as a limited time trial from Flaming Pear), the capital I from the Dividers font by the former Moonlight Designs, and Vandy's Pleated Cotton BladePro preset (hosted here with his permission). For best effect you will also need a subtle white fabric image like this white linen (right click to save image):

Open a new image 600x600 pixels with a transparent background. Flood fill the image with black.
Set your foreground color to white.
PSP5 users: Create a new transparent layer over your black background layer.
Select the Text Tool. Set the font to Dividers, the size to 36, set the text color to white. Check create as vector, floating, and anti-alias. In the text box type a capital I (i) and click OK.
If you don't have the Dividers font use this PSP file to copy and paste (ctrl-g) the vector shape into your image. This only works for PSP6 and above.
PSP5: Rotate the text 90° left and place it at 3,0. Copy and paste as a new floating selection (ctrl-e). Place it at 3,170 and a third at 3,340.
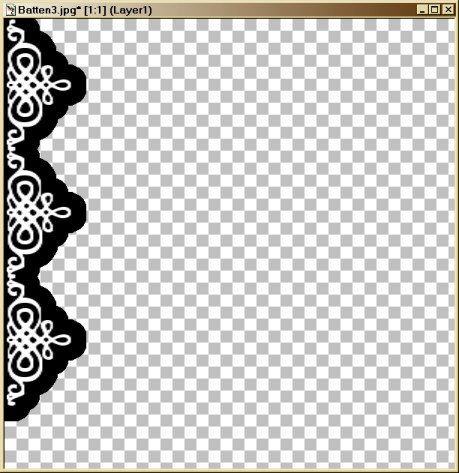
PSP6: Grab the rotation handle and turn the design 90° to the left and place it at the top left corner, lining it up near the edge. Leave a bit of space at the top, a couple pixels, to make a later step easier. Copy and paste as a new vector selection (ctrl-g). Line it up with the first so the end of the last 'hook' of the first design is overlapped by the first 'hook' of the current design. Add a third overlapping the second the same way.
You should have something that looks like this (image reduced for faster loading):

PSP5: Go to the Selections menu. Select all. Float Selection. Switch to the Deformation Tool (it's the one under the magnifying glass).
PSP6: Switch to the vector editing tool and select an area that includes all three designs. (This is why you left a bit of space at the top earlier, if you don't totally enclose all three objects it won't select them all.)
Now you have the vector deformation handles around your designs. Grab the right side handle (the little box) and stretch your design out like this:

PSP5: Select any other tool. When the "Apply Deformation?" box pops up click yes.
PSP6: Go to the layers palette, right click on the vector layer and select convert to raster.
From now on the process is the same for PSP5 and PSP6.
Choose the Magic Wand tool. Click anywhere on the right of the lace area. Go to the selections menu and select Invert. Go to the Selections menu again, select Modify > Expand and enter 20 in the box. Click OK.
Switch to the black layer. Invert the selection and hit the delete key.
Go back to the lace layer and repeat the selection and expansion, this time expand only 15. Switch to the black layer and hit delete again, you now have a black edging line.
Select the black line and go back up to the lace layer. Go to Selections > Modify > Contract and enter 1. Then Selections > Modify > Feather and enter 1. Flood fill this selection with white. The contraction and then feathering acts like the anti-aliasing on the font and will help the lace look smoother.
Refill the black layer with black and you should have something like this:

Once again select on the right side of the lace layer. Go to Selections > Modify > Expand and enter 2. Go to the black layer and hit delete. This creates a black 'fabric' under your white 'embroidery.'
Add a layer under the black layer and fill it in with any color you wish, I'll use a light blue. Later this will be filled in with the tiling pattern you want for your base fabric.

Back up on the lace layer select all the little loops you want to cut out of your lace. Use the Magic Wand tool and hold down the shift key as you select each loop.
Go to Selections > Modify > Expand and enter 2. Move to the black layer and hit delete.
Flood fill the black with the white linen pattern (you can flood it before you select the loops and cut them out if you like).
At this stage it's hard to see the details but a little drop shadow and BladePro will fix that.

On the lace layer select any of the white lines with the Magic Wand and then go to Selections > Modify > Select Similar and all your lines should be selected for you.
Go to Image > Plug-in Filters > Flaming Pear > Blade Pro and apply GV_PleatedCotton.
Deselect the embroidered lace and go to Image > Effects > Drop shadow. Made the shadow color black, the opacity 50, blur 5 and both offsets 1. Click OK.
Move to the linen layer (formerly the black layer) and apply the drop shadow, this time with a blur of 40 and both offsets set to 5 (leave the opacity the same).

Now crop the image down to only the middle portion of the lace. Crop from 0,174 to 600,344. And you're done.

Finishing touches:
- Go to Image > Canvas Size and resize the image to a width of 1200 and a height of 170 with the image placed at Left: 0 and Top: 0.
- Flood fill the bottom layer with some fabric-like background image. For best results the image should evenly fit into a height of 170 pixels (so it should be 170, 85, 34, or 17 pixels high for the best fit, width doesn't matter in this case).
- To make this as a top border simply do not rotate the font image at the beginning and align them along the top edge of the image rather than the left side. When you flood fill the fabric the image should fit into a width of 170.
- Make a bar and buttons using the same basic method, just arrange your lace in the middle of the image rather than the edge. Scale the font size down (try 28 perhaps) and expand less, maybe 15. I made my buttons and bar not much smaller than the side lace and just resized the final image.
- Keep a PSP file with all your layers so you can change the background fabric without having to recreate your lace.
Now you can go try Ronni's Battenburg Lace Angel tutorial.
 |
 |
 |
©2000 Lynn A. Davis