Stained Glass Butterflies
Recently on one of my mailing lists there has been a flurry of activity about making stained glass butterflies. I have a couple vector shapes that I've made from photos of stained glass ornaments that are perfect for this sort of thing but they need a bit of explanation about how to use them. This is the explanation.

Download the vector shapes file and unzip it into your shapes folder. (This is a PSP7 shapes file.)
Open a new image 500x500 or the size of your choice. Use a transparent background. For clarity on this webpage I'll be using a colored background.
Select the shapes tool.
Go to the tool Options palette and make sure "retain style" and "create as vector" are checked.
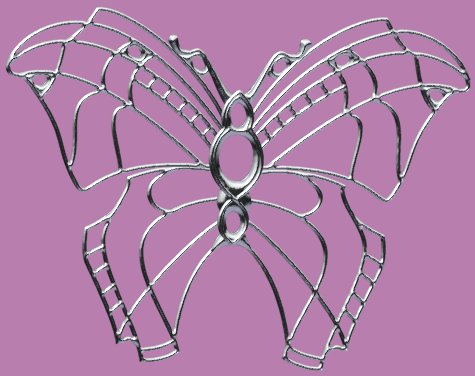
Select "butterfly lead 2" to duplicate this tutorial or "butterfly lead 1" for a slightly simpler image.
Hold down the shift key and draw the vector shape in your image. The shift key forces the proportions to be the same as they are in the original shape. If you need to resize the butterfly after you have drawn it use the right mouse button to drag the corner 'handles' of the vector shape.
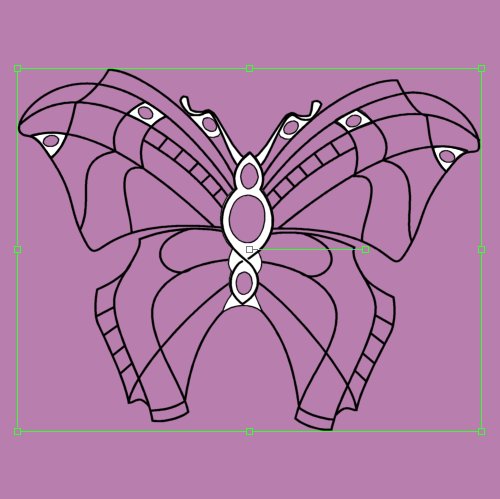
As you can see, the shape is in black and white. To be useful to us it should be in white only and the various parts need to be on separate raster layers. I also need to thicken up the lines that make up the wings a bit.
Open the layer palette and observe the current layer structure (left hand image). Create 5 blank vector layers. (middle image). Move each vector shape to its own layer (right hand image).
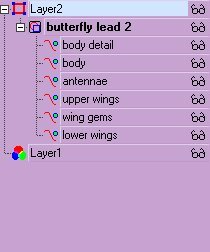
You may want to rename the layers to match the parts they hold.
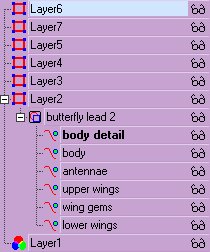
In the layer palette, right click on "body detail" and select 'properties'. Change the stroke width to about 4 (thicker, but still leaving an indication of a gap at the crossing point) and the stroke color to white. Convert the layer to raster.
Go to the "body" properties the same way, leave the stroke width alone but change the stroke color to white. Covert the layer to raster.
Treat the "antennae" as you did the body, change the stroke color but not the stroke width. Covert the layer to raster.
For the "upper wings" increase the stroke width to 4, change the stroke color to white. Covert the layer to raster.
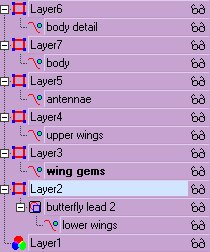
For the "wing gems" leave the stroke width alone, change the stroke color to white. Covert the layer to raster.
Treat the "lower wings" like you did the "upper wings". Covert the layer to raster.
The image isn't all that thrilling now but here's where you get creative.
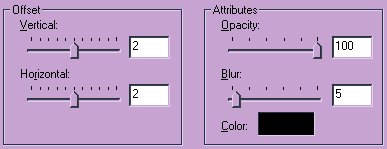
Go to the "body detail" layer. Select all (ctrl-a), float the line by clicking on it with the 'magic wand' and apply a metallic Blade Pro preset or the metallic filter of your choice. (I'm using my 'silver' SBP preset.) Save the selection to the alpha channel.
Repeat this step on all the other layers.
As you can see the details get a bit lost in all the silver so each piece will get a small drop shadow to make it stand out a bit.
Create a new layer at the top of the stack. Load the "body detail" selection from the alpha channel and apply the following drop shadow:
Make a new layer below the previous layer, load the "body" selection, and add the same dropped shadow.
Repeat making layers and dropping shadows for the antennae, upper wings, wing gems, and lower wings.
Now load the "body" selection again.
Go to each of the shadow layers for the antennae, upper, and lower wings and hit 'delete' to cut out overlapping shadows.
On the "wing gem" layer load the selection for the upper wings. Hit delete. Invert the selection.
With a small eraser erase the shadows in the following areas:
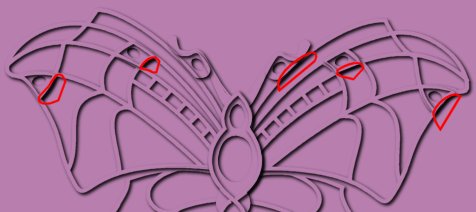
Load the "antennae" selection and hit delete. Go to the upper wing shadow layer and hit delete as well.
All of this makes it possible to put the shadows over the leading and glass layers, which we need to be able to do so we can fill the glass in properly.
Turn off all layers but the shadow layers. Make sure one of the shadow layers is active and merge visible layers.
Turn off all layers but the silver layers. Make sure one of the silver layers is active and merge visible layers.
Turn all layers on.
You should now have something like this image.

Get a bunch of stained glass samples (like those on SpectrumGlass.com) and start filling in the holes using the following method:
Create a layer under the silver layer for the glass fills.
On the silver layer, with the magic wand (sample merged turned off, antialias turned off), select the area you want to fill.
On the glass layer go to Selections > Modify > Expand and enter "2".
Fill the selection with your glass pattern. (I like using the clone tool for this so I can select the portion of the glass image I want to use.)
Go back to the silver layer to make your next area choice and repeat.
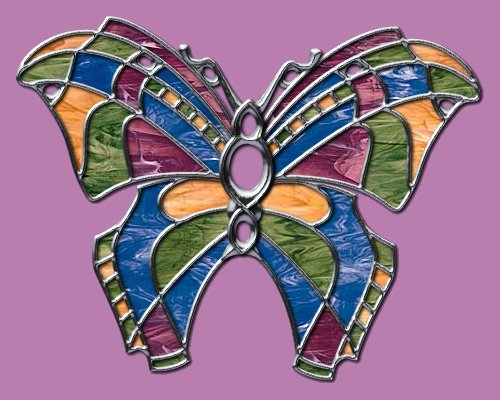
Now, for the assorted gems. You can use tube images to fill the holes, perhaps with a bit of deformation to make them fit, or you can use the same method as you did for the glass but instead of using a glass fill use white and apply a Blade Pro preset.
I'm going to use tubes.
Create a new layer under the silver for your gems. Select a tube and apply it to the area you want to fill.
Use the deformation tool to reshape/resize/turn your tube image to fit the hole. (Similar to how the Glass Dome tutorial worked.)
Repeat to fill all the holes.

A variation of this leading pattern would be to leave the "wing gems" layer out entirely so that only the three jewels in the body would be left.

©2003 Lynn. A. Davis