Making PSP Crochet Chain Tubes
(Making Angular Placement Tubes)
This tutorial assumes basic knowledge of Paint Shop Pro tools.
Open a new image 500x500 pixels, transparent background.
Set your foreground color to whatever you want your yarn color to be. [PSP7: make sure your background style is set to no style (circle with slash).]
Select the line tool. Use 'bezier line' and set the ends of the lines to rounded. Make sure 'create as vector' is checked
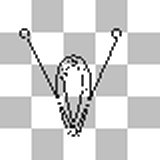
Double click to make both ends of the line in the same place. Then click and drag twice to make a loop. While dragging the second time you should have something like this (shown 200%):
Adjust the shape as needed using the Vector Selection tool or node editing. (Or just undo and try again.)
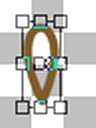
Once the loop is adusted it should be something like this (image shown at 200%):
Select the shape and copy and then paste it so you have a second small image. The copied image should be a vector shape.
Go back to your main image. Move the loop toward the upper left corner of the image. Placement isn't critical, just leave enough space around it for a drop shadow (which will applied later).
Switch to the small image with the line in it. Go to Image > Rotate (or use ctrl-r) and rotate the image 10° to the right. Go to Edit > Copy (or use ctrl-c).
Switch to the main image and Edit > Paste > As New Vector Selection (or use ctrl-g). Place the line to the right of the open link.
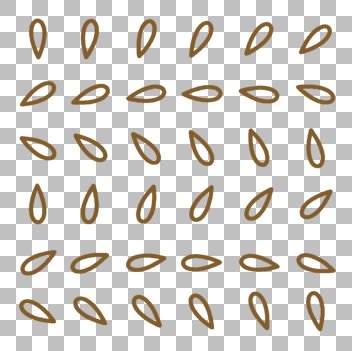
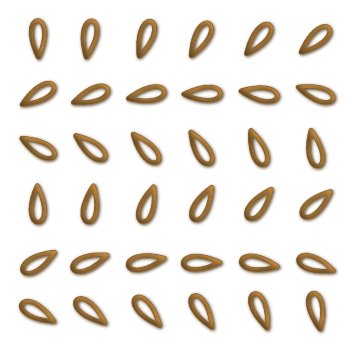
Repeat rotating and pasting until you have 6 loops in a row and 6 rows. You should have something like this when you are finished:
Now duplicate your vector layer and convert it to raster. Turn off the vector layer.
Activate to your converted layer. Go to Selections > Selection All (ctrl-a). Then Selections > Float (ctrl-f)and then Selections > Defloat (shift-ctrl-f). This selects all of your links with their antialiasing.
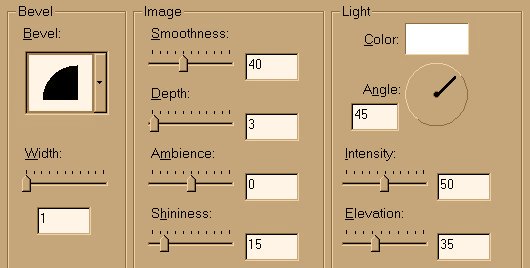
Apply Inner Bevel with the following settings:
Apply a drop shadow, make sure the shadow is opposite the light source in your preset. A blur of 5 and offsets of 1 will suit most loops, but adjust as necessary. Pick the color for the shadow from the darkest portion of your loops and make it slightly darker.
Now to assemble the actual tube.
Use the selection tool and select the first link, float it and click on it and move it slightly, watching the coordinates at the bottom of the PSP window, the size of the selection will be listed (it's the pair of numbers that doesn't change). The larger number is the minimum size of your tube's cells. Mine is 48.
Multiply the cell size by 6 and open a new square image of this size.
Turn on the grid under View. Set the grid spacing to your cell size both vertically and horizontally.
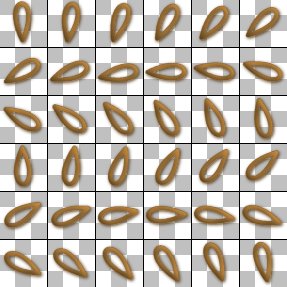
Now copy each link from the working image into the new image, placing each in the center of it's cell.
Save this as a .psp file for now. Save your working image if you want to use different effects on your loops (just duplicate the vector layer and finish your loops as you wish).
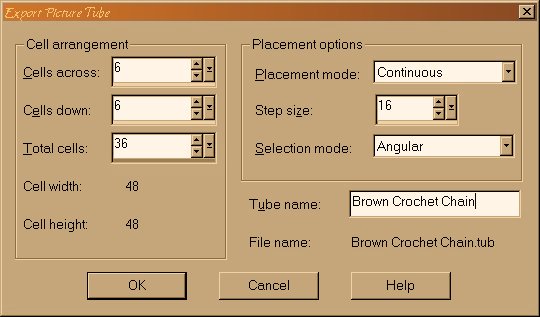
Go to File > Export > Picture Tube and use these settings. We can't be sure of the best step size so use about one third of your cell size for now and name your tube whatever you like.
Open a new image 500x500 and test your new tube. In the tool palette you can adjust the step size until you get an effect you like.
After testing it turns out that 20 works well for my tube, your tube will likely be different.
If you made your loops monochromatic you can simply colorize your image and export tubes in different colors rather than making a fresh tube from scratch.
Back
©2000 Lynn A. Davis