Pearl Strands with PSP Tubes

There used to be a tutorial for pearl wrapped frames by Simply Pixelating but it seems to have been removed. Since I got a request for help on making pearl strands I've decided to make a short tutorial on making them with tubes.
Any round tube such as gems, beads, even m&m™ candies, will work for this tutorial. I'll be using one of my pearl tubes available elsewhere on this site.
Open a new image, somewhat large, about 500x500 pixels.
 Select your tube
and make sure your Tool Options window looks like this:
Select your tube
and make sure your Tool Options window looks like this:
The important thing here is the "Step" number.
The step is the distance in pixels between the centers of each element
of the tube.
In general you want this number to be about the same as the width of the tube's cell. If the pearl has an antialised edge you'll want it to be two pixels smaller to make the pearls a bit tighter on your strand.
All the pearl tubes on my site have recommendations for the step setting. If you don't know the cell size we'll look it up in a few minutes.
Now click on the middle tab of the Tool Options window.
 For strands your
placement mode must be 'Continuous'.
For strands your
placement mode must be 'Continuous'.
The placement mode tells PSP when you put down an image from the tube, since you want an unbroken strand you need it to be Continuous.
The selection mode is how PSP selects an image from the tube. Incremental means that it will place the second image after the first and the third after the second and so on. Some of my pearl tubes use this to alternate colors in a specific order like the the one I used to make this background.
If you knew what to use for a step size you can skip this next part, otherwise click the "Options" button.

As you can see, you can do the above to steps here as well.
The nice thing about this window is that it tells you the cell size of the tube.
If you haven't already set your placement mode to continuous and your step size either equal to the cell size or two pixels smaller.
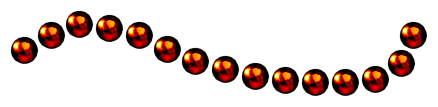
Now that your tube is all set up go to your open, blank, image and draw some lines with your tube. If the step is correct it will look something like this:

If the step size is too large it might look like this:
And if it's too small you might have something like this:

Adjust your step size up or down to get the look you want. If you're planning to add little knots or beads between your pearls you might want to use the larger step for instance.
And that's it.
If you want smaller pearls change the "scale" in the options but do NOT change anything else. PSP will adjust the step internally to fit the scale you've chosen.
Tutorial Index
©2001 Lynn A. Davis