Seamless Tile Tutorial
![]()
This effect mimics the tile effect produced by the program 20/20. You will need Paint Shop Pro 6 or another paint program that allows the use of layers, user defined gradient fills, and masks. In addition you will need to download and install the filter called Half Wrap from the Simple Filters site.
There are several ways to make seamless tiles, which to use is mostly a matter of preference and trial and error. This site gives a good overview of them and includes a method similar to this one but without the mask.
You will need a simple mask for this technique. I recommend making your own, especially if you aren't that familiar with PSP and user defined gradient fills. However you can just download my mask, unzip and save it somewhere on your hard drive if you are in a hurry. I made a Masks directory under my PSP directory to keep my collection of masks in. If you opted to download my mask go ahead and skip the section on making the mask.
![]()
Open a new image 500x500 pixels.
Set your background to Black <0,0,0> and your foreground to White <255,255,255>.
Select the Flood Fill tool and set it to a Sunburst Gradient.
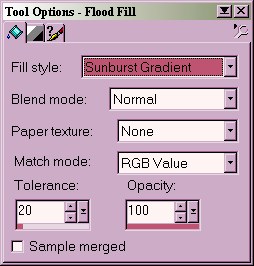
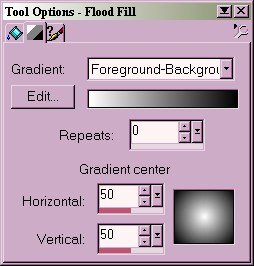
In the Tool Palette click the middle tab and center the Sunburst Gradient at 50 vertical and 50 horizontal. Set the Repeats to 0 and click the Edit button.
Select Foreground-Background and click the Copy button.
Name the new gradient Foreground25%-Background25% and click Okay.
Add a new point to the gradient by clicking under the gradient bar. Set the color of the new point to the foreground color and drag it to the 25% mark. This creates an area 25% of the gradient that is the foreground color with no background color feathered into it.
Add a second new point between the last point you added the the background color end of the bar. Set the color to the background color and drag it to the 75% mark. This creates an area 25% of the gradient that is the pure background color. The 50% left between the two points you added is where the actual gradient is made.
Your Gradient Editor window should look like this:
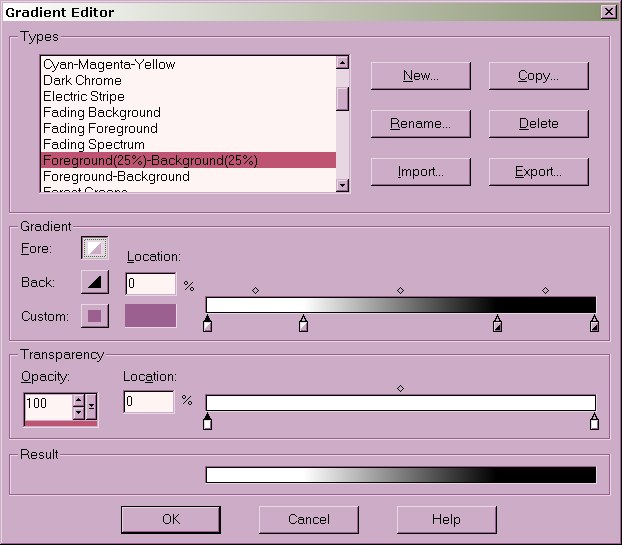
Click OK.
Flood Fill your image. You should have a white center and a black rim like this:

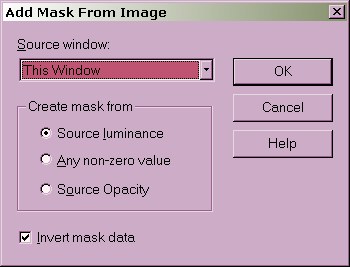
Go to Masks, select New, From Image, choose Create Mask from Source Luminance and make sure the box for Invert Mask Data is checked like this:
Click OK. Go to Masks > Save to disk... and save your mask to your hard drive, I named mine 25-25CircleGradient.
Now to make the seamless tile.
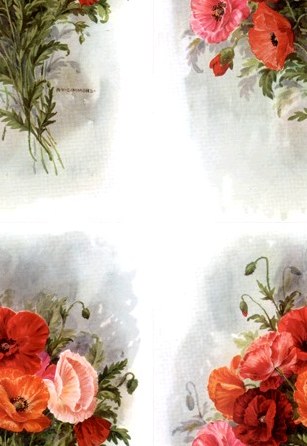
Open the image you want to tile, you may use this image if you like (right click to save the image):

Go to Layers and choose Duplicate.
Go to Image > Plug-in Filters > Simple, and choose Half Wrap.
You should now have an image with two layers, one with a centered bunch of flowers and one that looks like this:
Go to Masks >Load from Disk..., and go to where you saved your mask (whether you made your own or downloaded mine). Select the mask (mine is named 25-25CircleGradient.msk) and click Open. The mask is applied to the currently active layer (the half wrapped image) and....

Viola! A perfect seamless tile. Mute it and you have a nice floral background.
Some images won't tile perfectly because there is a sharp contrast between the top and bottom and the right and the left. If you want to tile an image that has this problem use the wrap and touch-up method first just to blend the edges then use the Half Wrap filter to re-center the image and use this mask method.
![]()

©2000 Lynn A. Davis except original bouquet graphic, copyright unknown