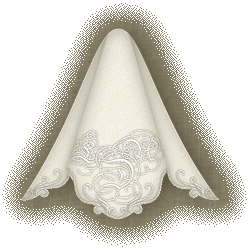
Vector HankiesThis tutorial is a basic introduction to making vector shapes in Paint Shop Pro 6 & 7. There are several approaches that would work as well as this one but I have selected what I believe to be the simplest, modifying a pre-existing standard shape. |
 |
Create a new image 500x500 pixels (or whatever size you feel comfortable working with).
Open the pattern fill for your hanky, I'm using a slate blue linen for clarity, you can download it if you wish.
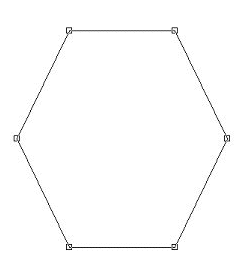
Click on your shapes tool and in the tool palette select 'hexagon', 'antialias' and 'create as vector'.
In PSP6 select 'stroked and filled' and set your foreground and background color to black, later you will make a mask to allow you to make a pattern fill with antialiased edges.
In PSP7 set your foreground and background styles to pattern fill and select your hanky fabric.
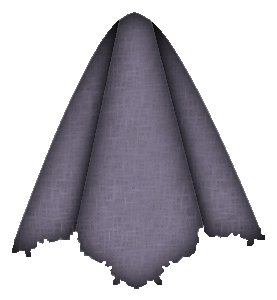
Draw a hexagon, it doesn't matter what size as long as it's big enough for you to work with.
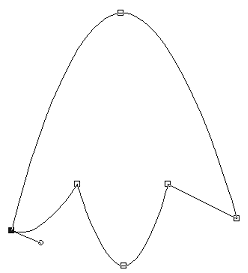
Switch to the vector tool (box with squares in the corner and an arrow in the center) and right click on your hexagon. Select 'Node Edit' and your hexagon should look something like this:
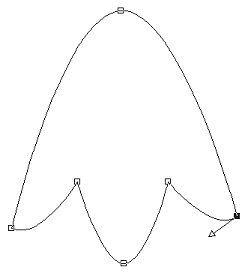
Click and drag each node (small square) until you have a shape similar to this:
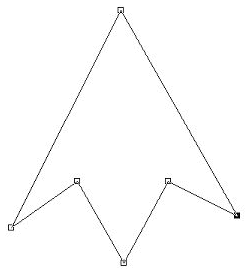
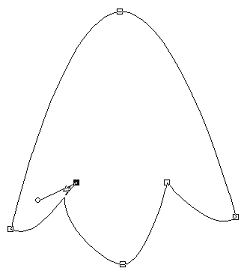
Click on the top center node then hold down the shift key and click the bottom center node to select them both. Right click and select Node Type > Symmetric. Your shape should look something like this:
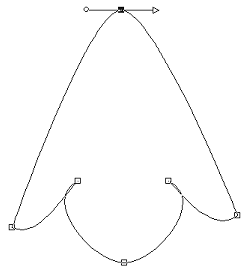
Now you're ready to grab arrows and shape your lines.
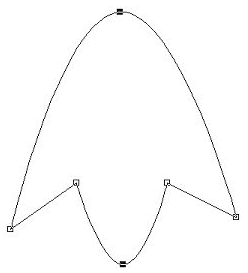
Click on the lower left outer most node then right click and select Node Type > Curve Before.
Click on the handle and curve your line something like this:
Click on the opposite node, right click and select Node Type > Curve After and curve the line to mirror what you did on the left side.
Now click on the inside left node, right click and select Node Type > Curve Before, right click and select Node Type > Curve After, and adjust both handles until you have a shape something like this:
Repeat on the right inside node, adjusting to mirror what you did on the left.
Select the bottom center node and adjust the arrow to make a pleasing rounded corner for your hanky.
Select the top center node and adjust the top point shape. Adjust other nodes as needed until you have something like this:
Right click and select 'Quit Node Editing'.
You now have a new vector shape.
You can choose to export this shape so you can use it again in the future just like the standard shapes.
If you choose to export the shape it will save disk space to make it smaller first:
- Duplicate the image (Window > Duplicate) and select the vector shape in your duplicate.
- Right click and select Properties. Enter a name for your shape (for example, 'Hanky Blank'). Click OK.
- Using your RIGHT mouse button, click and drag one of the corners to shrink the shape while maintaining the aspect ratio.
- Crop the image to fit the new smaller shape and go to File > Export > Shape...
- Type in the name of your new shape file
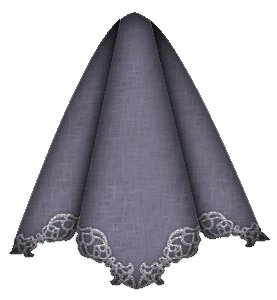
Select a dingbat font with simple lacy designs, borders, dividers, and corners work best. I'm using the 'E' from the Deco Dividers font and have saved it as a vector shape so you can download it if you don't have the font. Just open the PSP file, copy, and then go to your vector hanky image and press ctrl-g to paste as a vector object.
Right click on the lace and select Convert Text to Curves > As Single Shape. (Ignore this step if you are using the file downloaded from this tutorial.)
Right click again and select Node Edit.
Click and drag a selection around the left half to select all the nodes and hit delete. This gives us half of the lace which is more flexible than the having the whole thing. Quit Node Editing. [Note that this only works easily when there are distinct shapes within the dingbat. Single shapes can be cut and edited but it takes more work and inventiveness.]

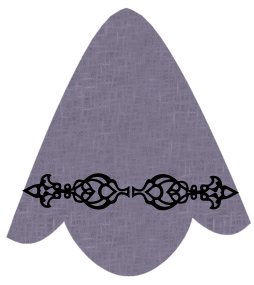
Now copy the lace and ctrl-g to paste another copy as a vector object. Place them along the edges of the middle lobe of the hanky and adjust them as you like.
Paste in two more and adjust them on the outer lobes. Don't worry if they over lap at the inner corner, we'll fix that later. The same deal with gaps at the edge of the hanky.
At this stage we're going to have to convert this to raster (to keep things simple, everything except the shading can be done as vectors if you feel comfortable with node editing.)
Before converting select all your vector objects and resize it to size you want your finished hanky. (Save a copy of this image as a PSP file now so you can make other sizes later without having to totally remake everything!)
After resizing you want to divide your vector objects so they are on three layers. Make new vector layers if necessary so there are three of them in your image.
On the top vector layer place the outer lobe lace edging.
On the middle vector layer place the center lobe edging.
On the bottom vector layer you want to have just the hanky.
Convert each vector layer to raster by making it active and going to Layers > Convert to Raster or right clicking on the layer in the layer palette and selecting the option there.
On one of your lace edging layers select around the lace with the magic wand. Go to Selections > Invert, then Selections > Modify > Contract and put in 1.
On your hanky layer use the clone tool (hardness of 80, opacity to 100, and size to suit your image) to fill in areas where the edging goes over the edge of the hanky within the selection.
Invert the selection and use the eraser (hardness 80, opacity 100, size to suit) to remove areas where the hanky extends beyond the edging.
Repeat for the other lace edging layer.

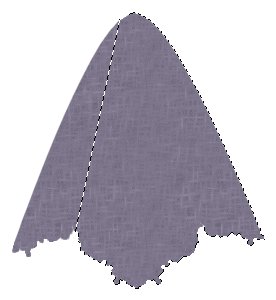
Using the magic wand, select around your hanky and then go to Selections > Invert and Selections > Save to Alpha Channel. Name the saved selection 'hanky' or something similar.
With the selection still active switch to the lasso tool, make sure antialias is checked in the tool palette and that the tool is set to 'point to point.'
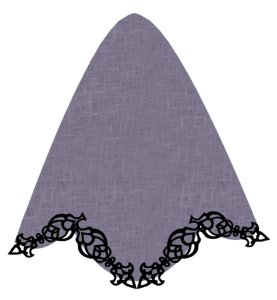
Turn off the edging layers so you can see your hanky shape clearly. Hold down the ctrl key and click at the highest point of the left inner corner, click again off to the side of the top point, and then click as needed to surround the left lobe of the hanky. Right click to close the selection. You should end up with a selection something like this:
Repeat the process on the right side so you have only the middle lobe of the hanky selected. Save this selection to the alpha channel as 'middle.'
With the selection still active, switch to the magic wand tool. Hold down the shift key and select the area around the hanky. Invert this selection and save to the alpha channel as 'sides.'
Create a new raster layer. Apply the Cutout filter with offsets set to 0 and a blur of about 40 (how much to blur depends on the size of your hanky). Use black as the shadow color and make sure the 'fill interior with color' box is unchecked.
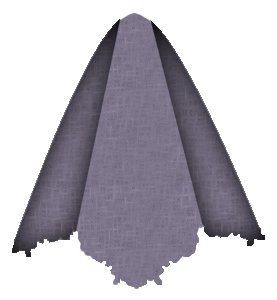
Load the middle selection from the alpha channel and apply the same cutout settings. Then apply a drop shadow with offsets to 0, blur of 20.
Load the full hanky selection, invert it, and hit delete to remove the extra drop shadow.
Place this shading layer above all other layers in the layer palette and turn on the two edging layers.
If the lace color is not what you like use the color replacer tool change the color. Do this by making your background the current lace color, your foreground the desired color, and double clicking on each edging layer.
Select the lace (magic wand tool, then Selections > Modify > Select similar) and apply the finish of your choice. I'm using Vandy's Pleated Cotton Blade Pro preset.
To make the lace stand out apply a drop shadow with both offsets set to 0, blur 5, opacity 50, and with a shadow color of black or a very dark shade of the color in your hanky fabric.
Once your lace is completed on both layers switch to the middle edging layer, load the side selection from the alpha channel and hit delete to cut off excess lace.
Switch to the side edging layer and load the middle selection, hit delete to cut off excess lace.
On one of the lace layers load the full hanky selection, invert it, contract by 1, feather by 1 (Selections > Modify > Feather) and hit delete to clean up the bottom edge. Switch to the other lace layer and hit delete again.
PSP6: Turn off all layers but the hanky. Go to Masks > New > From Image and make sure the 'invert mask data' box is checked. You can now flood fill the mask with your chosen pattern.
PSP7: If you don't like your pattern at this point you can use the color replacer tool to change it. Select your current hanky pattern in your background style and the new pattern in the foreground then double click the image to swap them.
Adjust the opacity and blend mode of the shading layer to suit your taste. You can change the color of your shading with the color replacer tool. Set the background to black and the foreground to the new color and double click on the shading layer.
Merge the hanky, lace, and shading layers and then apply a drop shadow to finish.


 Tutorial
Index
Tutorial
Index
©2000 Lynn A. Davis