To make the shape you need for the Vector Brandy Snifter tutorial do the following:
- Create a circle (hold down the shift key while drawing an ellipse).
- Copy the circle (ctrl-c) and paste as a new vector selection (ctrl-g) twice.
- Select all three circles (either on the layer palette or with the vector
tool).
- Change to the vector tool
 if you haven't yet and on the tool options palette click the button to center
them
- Right click on the image or layer palette and select 'Group'.
- Select the bottom circle, right click the layer and select properties.
- Set the stroke to nothing and the fill to gradient. Use the linear gradient,
fading foreground, angle 110, repeats 1.
- click OK and PSP will save this as 'current gradient' for the shape.
- Edit the properties again, change the gradient so the color is solid across
the gradient (rather than using your current foreground and background colors)
and the opacity to goes from 100% at the left to 28% at the right.
- Select the middle circle, right click the layer and select properties.
- Set the stroke to nothing and the fill to gradient. Use the circular gradient,
fading foreground, horizontal 36, vertical 37, repeats 0.
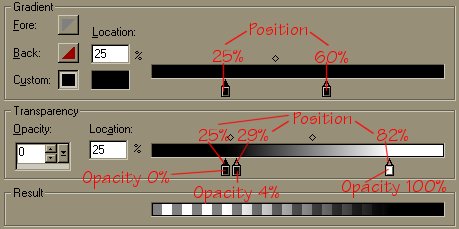
- Go back into the properties for this circle and edit the gradient to match
this:

- Select the top circle, right click the layer and select properties.
- Set the stroke to nothing, set the fill to circular gradient, fading foreground,
horizontal 36, vertical 37, repeats 0.
Return to the tutorial to see how to finish
editing the final circle and continue making a snifter.

