Braids - Part One

Creating braids in any image program is very simple once you know the simple formula for laying out the braid. My program of choice is Paint Shop Pro but any program will work, even one that doesn't have a bezier line tool since you can free hand draw the braid as well. Layers make it much cleaner to braid.
First, decide the number of strands you want to braid. Traditional braids are three strands, the one on the side of this page is four strands. Any number will work but a two strand braid is just a twist and a 20 strand braid is just woven fabric unless you do something more exotic with it.
Let's use a four strand braid and just make a straight section first.
Open a new image 500x500 pixels. It doesn't matter what the background color is.
Add a new raster layer.
Draw two straight lines 5 pixels wide vertically across the image. I'll place mine at 150 and 350 pixels so you can see what's going on. Again color doesn't matter, just make sure you can see them.
Now draw horizontal lines across the image using a 1 pixel wide line. You must make at least four times as many lines as strands in your braid if you want to be able to tile your braid. For our four strand braid we need to use at least 16 lines. I'm going to use 20 and place them every 25 pixels.
Now you have something that looks like this (image reduced by half):

Now to start braiding.
Add a new raster layer. Set you line tool to bezier line, 5 pixels wide, and some color you can see clearly.
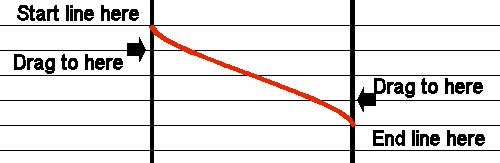
Since this is a four strand braid draw a line from the intersection of your first horizontal line and the left vertical to the fifth horizontal line and the right vertical. Then click on the line and drag the handle to the intersection of the second horizontal and the left vertical. Click again and drag the second handle to the intersection of the fourth horizontal and the right vertical. The line should look like this (minus text of course):
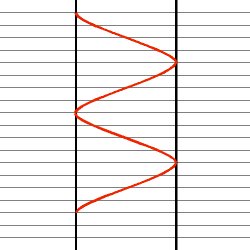
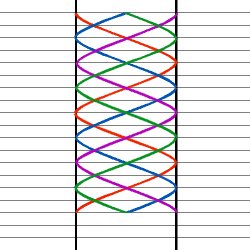
Draw another line from the end of the first one across to the left vertical four lines down. Click and drag the first handle to the right vertical and the sixth horizontal then click again and drag to the left vertical and the eighth horizontal. Continue down the entire image in the same manner. You'll have something like this:
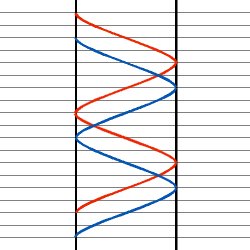
Add another raster layer. Starting at the third horizontal on the left vertical draw the next strand in the same manner as the first.
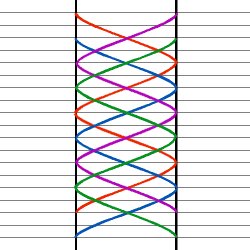
Repeat adding a layer and drawing lines twice more. By now you probably have figured out the formula of the braid. You start a line and end it on the opposite side the same number of guidelines down as the braid has strands. So for this four strand braid you start a line, cross three lines and end it on the fourth line down on the opposite side.
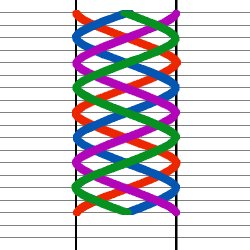
Now you can see that the ends of this have to overlap to make the braid connect to itself. Use the guidelines to sweep a rectangular selection across the bottom at the ends of the red and purple lines and drag the end of the blue and the green line up to the top to even up the braid (you'll have to do this twice, once for the blue layer and once for the green.)
Right now it looks rather sickly so go to each line later and select the line, expand the selection by 5 and flood fill with the appropriate color.
Okay. Now we do the over/under thing and braid these. Start with the bottom line layer. Select the line. Switch to the next layer up and start doing the over/under thing, erase anyplace it would go under the line on this layer. Move up a layer and do the same thing. Do it again on the next layer up and then add a layer and apply a drop shadow.
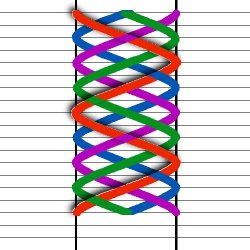
Go to the second line layer, select the line, move up a layer and erase the parts where it goes over that line. Move to the top line layer, erase the parts where it goes over that line and then go up to the shadow layer.
On the shadow layer erase drop shadows the cross the line but not ones at the ends of the line segments and then apply a drop shadow.
Repeat for the last two lines.
As you can see, some places have shadows that don't look that attractive even with doing the shadows this way (shadow on the red where the purple passes under it for example) but you can touch that up by hand. I'd suggest finishing your cording first since the shadows often look better when the lines look more like round cords.
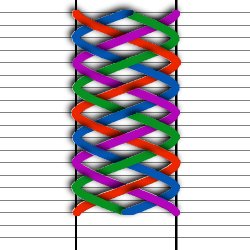
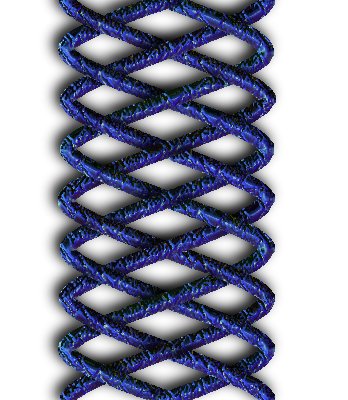
If you want to use Blade Pro or some other filter or technique to make the lines look like cords you can either do it before you do the cutting or after. It's largely a matter of taste. Here's my cleaned up braid:
In summary, here are the steps for making straight digital braids:
- Decide on the number for strands.
- Draw a grid to make your braid on. Use a number of guidelines that is at least 4 times the number of strands in the final braid to make a complete repeat of the pattern. I recommend using at least 6 times the number of strands so the shadows will tile as well when you take the middle repeat.
- As you draw the lines of the braid drop down one line for each strand of the braid (if you start at line one you'll end at the line that is 1 plus the number of strands in the braid).
- Drag the handles of the bezier lines to the next guideline on the grid in the direction of the other end of the line.
- Start your second strand on the same side as the first leaving one guideline blank between them.
- Work from the bottom up when weaving and make your shadows on a separate layer above the cords of the braid.


©2000 Lynn A. Davis