Braids - Part Two
If you have not read part one of this tutorial go do it now. This tutorial makes very little sense without the knowledge in the first braid tutorial since I do not repeat how to do the actual braiding.

In part one we created a straight segment of braid and discovered some basic steps for making braids in general. Now we'll take those basic steps and adapt them to braiding a closed shape.
First, an overview
of the basic steps:
- Draw the shape you want to braid. Draw an inner shape and an outer shape to establish the inside and outside of the braid.
- Decide on the number of strands in your braid.
- Multiply the number of strands by 2. The number of guidelines in your shape must be a multiple of this number.
- Draw equally spaced guidelines on your shape.
- Braid.
A note on how PSP does coordinates. PSP starts counting at 0 (which makes perfect sense to mathematicians and scientists) so an image that's 500x500 pixels is numbered from 0 to 499 in each direction. That's why the coordinates in this tutorial are what they are, they account for the upper left corner being (0,0) and not (1,1).
Open a new image 500x500 pixels, any background color.
Add a new layer.
Draw a circle stroked (not filled) with a line width of 5 in the center of the image. For PSP6 start at (249,249) and drag out to (50,50) or so. For PSP7 users drag from (50,50) to (450,450).
Draw a circle inside the circle to make the inner edge of your braid. I'm drawing mine from (150,150) to (350,350). [I'm so glad that PSP has stopped drawing the circle from the center with PSP7!]
Now to set up the thin guidelines. Decide how many strands to make your braid. To keep this tutorial shorter I'm using 3.
Decide how many repeats to use around your shape. I'll choose 6 to keep this simple (you'll see why this makes it simple in a minute).
Figure out how many guidelines you need for your braid. Multiply your number of strands by 2 (so 3x2=6) and multiply this number by the number of repeats (6x6=36).
Divide the number of degrees in a circle (360) by the number of guides (36) to get the number of degrees between each guideline (360/36=10).
So I have to draw a guideline every 10 degrees around the circle. The easiest way is to first draw a line vertically from (249,0) to (249,499) and then one horizontally from (0,249) to (499,249).
Duplicate this layer eight (8) times. Rotate the first duplicate 10°, the second 20°, the third 30°, etc., ending with the eighth layer being rotated 80°.
Turn
off the bottom layer and merge the visible layers to clean things up
a bit.
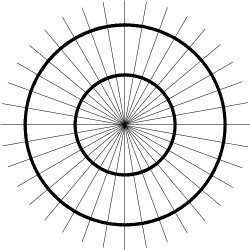
Turn the bottom layer back on and you should have something like this (image reduced by half):
To keep from having to do this again when you want to make another braid save this grid!
Braiding is done just as it was in the first part of this tutorial.
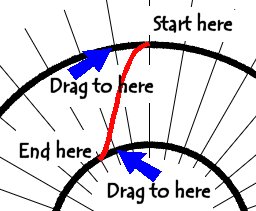
Start a bezier line at any guideline. Count the guides you cross as you go from one circle to the other, ending your line at the guide that corresponds to the number of strands in your braid (in my case I stop at the third line for my three strand braid). Curve the line by dragging the handles to the next guide toward the other end of the line.
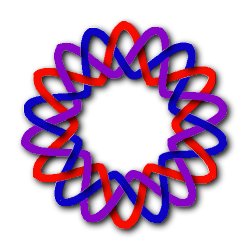
The completed braid looks like this:
To make the braided pearl strand around the jewels on this page I just traced a circular braid with my tube tool set up to make pearl strands and then deformed the merged braid to fit the jewel (see this site for the jewel tube).
I find it helpful to do the braiding with my lines (minus the shadow layer) first and then do the pearls so I can start my strand in one of the areas where I know it will pass under another. By starting (and stopping) the strand under another I know any small gaps or overlaps at the ends will be covered.
Suggestions for gridding other shapes:
Squares
- grid as you would for a circle. For large squares, grid as a rectangle.
Rectangles - think of it as four
straight braids connected by quarters of a square.
Rounded corners - grid the same
as squared corners, just curve your edge guides.
Ovals - where the long axis is not
that much longer than the short axis, grid as a circle. For ovals where
the long axis is significantly longer than the short axis, grid as a
capsule.
Capsules - grid as two straight
braids capped with half circles.
Other Polygons - if all dimensions
are about the same, treat them as circles, otherwise treat them as parts
of circles connected by straight braids.

©2000 Lynn A. Davis