Marble Columns

This tutorial covers how to make a smooth column with some carving at the capital. To make the shiny polish on the column parts you will need Blade Pro which you can download from Flaming Pear Software. You will also need my stone polish preset.
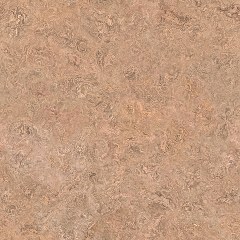
You may use any marble or smooth stone image to make columns (or even a plain solid color). If you would like to make your own marble image similar to the one on this page download and install the Designer Sextet from Flaming Pear and my soft marble preset for the Twist filter. Apply the filter to any image to make a soft marble pattern. The more contrast in the starting image the more vibrant the resulting marble will be. Most of the time you'll have to alter your new marble to make it a seamless tile.
Open a new image 500x500 pixels.
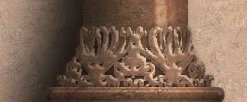
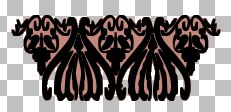
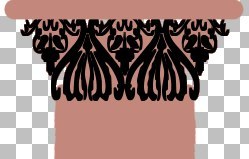
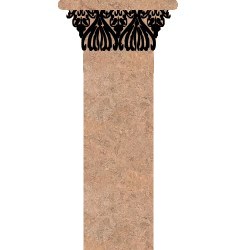
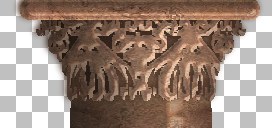
Choose a dingbat font that has a generally rectangular dingbat that looks suitable for the capital carving on a column. Place the dingbat about 40 pixels down from the top of your image and roughly in the center. I used the 'b' from a font called Design Dings 3 set to size 48. I applied it as a vector and stretched it to be taller. You can download the stretched ding in .psp format for this tutorial by right clicking on the jpeg below and choosing 'Save Target As...'.

Add a new raster layer below the layer with the dingbat.
Go back to the dingbat layer and use the magic wand tool to select the area around the ding. Go to Selections > Invert. Go back to the layer under the ding and flood with the selection with a color. It doesn't matter what color since you'll be filling it with your stone texture later. Now you should have a shape like this at the top of your image:
Now switch to the Shapes tool, set it to rectangle, filled and draw a long rectangle under your capital ding to make the body of the column.

Add a new layer over the dingbat layer. Set your line tool to Single Line, width 20, with curved end caps (second tab in the tool options palette). Draw a line slightly wider than the top of your dingbat. I use the 'cross hairs' of the precise cursor as a spacer, starting with the right hand '--' part touching the left side of the ding and drawing across so the left '--' part touches the right side of the ding. Then I move the line straight up to the top of the image. The top of your column should look like this:
As you can see there are some gaps in the fill under the ding. Go down to the bottom layer where the column body is and fill those areas in with your paintbrush or airbrush tool. There should be no gaps between the body of the column and the flat top.
Now choose your image to use for the stone of the column. You may use this image if you like:
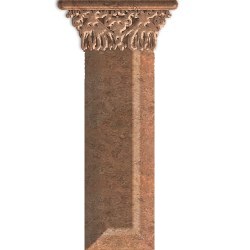
Flood fill the cap of the column (top layer, the bar), and the body of the column (bottom layer) with your stone image.
Go back to your stone image. Go to Window > Duplicate Window to make a copy. Go to Colors > Adjust > Brightness/Contrast. Set the Brightness to 40 and the Contrast to 0. Use this image to flood fill the dingbat.
Now to start making it look round.
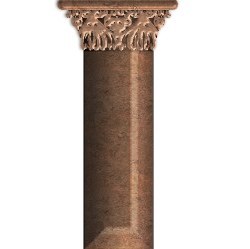
Go to the column body later, use the magic wand tool to select the area around the column. Go to Selections > Invert. Go to Image > Deformations > Cylinder - Vertical. Set the effect to 50%. Click OK.
Do the same on the other two layers, select around the shape, invert, and deform.

Now back to the column layer, select the column as before and go to Image > Plug-in Filters > Flaming Pear > Blade Pro and apply teph_stonepolish with the bevel set to 45.
On the cap layer apply the preset with a bevel of 7.
For the carving (dingbat) select the carving by using Selections > Select All, then Selections > Float, and finally Selections > Defloat. Then apply the preset with a bevel of 4.
Deselect the ding. Apply a drop shadow of the darkest color in you column or a bit darker with a blur of 10 and both offsets set at -2. Apply the same drop shadow to the top layer.
Now to refine the roundness.
Go back to the Column layer, select the column. Add a new layer over the column, go to Image > Effects > Cut Out with a blur of 80, vertical offset of 20 and horizontal offset of 60.
Add another layer and Cut Out again with a blur of 50, vertical offset of 0 and horizontal offset of -20.
Set both Cut Out layers to Overlay or Multiply and adjust the opacity to suit your taste.
Turn off all the layers except the cutout layers and go to Layers > Merge > Merge Visible. Turn all layers back on.
Sweep a selection across the lower part of the cut out layer and copy it. Go to the layer with the dingbat and add a new layer. Paste the shading into the new layer and switch to the deform tool.
Hold down the CTRL key and grab one of the upper corners and pull the shading out to cover the wide part of the ding. Then grab a lower corner and drag it in so the shading follows the shape of the ding. Switch to the magic wand tool. When the 'Apply deformation?' window pops up click 'yes.'
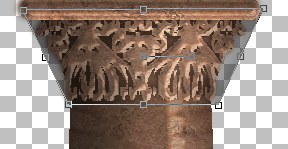
Go down to the ding layer. Select around the ding, hold down the shift key and select the drop shadow, the ding should be outlined now. Go back up to the shaped shading layer and hit delete to cut off the excess shading.
Go to the top layer, add a new layer, paste in the shading and deform it to fit the bar and trim it like you did for the ding.
Now we just have to work on the background.
Duplicate all the layers, shut off the originals, merge the copies. Move the merged layer to the bottom of the stack.
Go to Colors > Adjust > Brightness/Contrast and set the brightness to -255.
Turn on all layers.
Use the magic want tool to select the black silhouette of the column and move it to the left about one third the width of the column.
Go to Image > Blur > Gaussian Blur and set it to 50. Click OK.
Add a layer at the bottom of the stack and flood fill with your chosen background.

Now to cut this up into two pieces so you can use it in a webpage. First we'll trim this window down. Turn off the background and merge all other layers. Select all, Float, Defloat to select the column. Go to the background layer and then to Image > Crop to Selection.
Turn the Background back on (you may have to refill it).
Duplicate the window.
Crop one image to just the top part of the column leaving a bit below the carving of the capital.

Note the size of the image and go to your full copy. Double click the selection tool. Use the height of your top image for the field labeled top. Add to that the height of your stone image that you used in the column and use that number for the bottom. Make the selection the full width of the image. The selection should not include any of the bottom portion of the column where the bevel from the Blade Pro step is. Crop to the selection.

And that's all there is to it. You'll probably find you made it bigger than is practical for your page and will have to resize it. That's actually to your advantage since it feathers the edges and makes the column seem more real.
©2000 Lynn A. Davis