"Tin Cup" Necklaces

This style of necklace has been very popular over the last several years and gets its name from the movie that first popularized the look, Tin Cup.
This style of necklace can be made with any type of bead tube. I'm going to use a drilled bead in order to demonstrate the extra details that are needed to make the effect work with them.
I recommend making the necklace larger then you think you will need so you can see the details clearly while working on the image.
Open a new image 500 x 500 pixels or larger with a transparent background.
Select your bead tube. Set the step to at least three times the size of the bead (if you have the tube set up for strands just triple the step that is there).
Slowly draw the shape of your necklace. The beads will be slow to appear and will be spaced apart so don't be too elaborate with your shape.

Add a new raster layer and place it below your bead layer.
Select the 'rope' tube (comes with the CD version of PSP and available on Jasc's website).
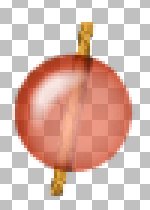
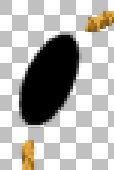
Adjust the scale of the tube until the rope is thin enough to fit through the drilled hole of your bead. My beads are 41 pixels wide and setting the rope to 25% works nicely as you can see in this closeup:
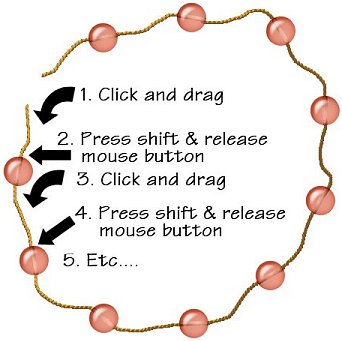
Once you have the rope set to the right size start drawing the cord of the necklace. Aim for the hole of the first bead, making sure the cord curves nicely.
When you reach the hole of the first bead press down the shift key, release the mouse button, then click at the other end of the drilled hole. The cord will make a straight line through the bead.
You may continue to hold down the shift key or release it as you draw the cord to the next bead, but be sure to hold down shift before releasing the mouse button at the next bead and clicking at the other side of the hole.
If you need to you can erase sections between the beads and re draw them but make sure to start and stop your corrections at the edges of the beads where they will be hidden later by the knots.
Add a new raster layer above the bead layer.
With the rope tube set to the same scale you used to draw the cord draw a small clockwise spiral, starting from the outside and working in. You only need to complete about one and a quarter turns but the 'knot' should be a bit wider than the cord. (Or think of it as drawing a small G shape starting to the inside of the cord, wrapping 'around' it clockwise, and ending in the center.)
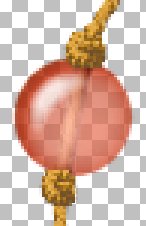
Place knots on either side of each bead.
Now we need to add a clasp. There are some clasp tubes out there but I'll make a simple, closed, clasp in this tutorial.
Select the shapes tool. Set the fill set to white, the stroke to nothing, and check create as vector and antialias.
Draw an ellipse between the ends of your cord. (shown in black for clarity)
Change the stroke to white and the fill to nothing and draw a circle on either end of the ellipse. Adjust the thickness of the stroke until the circles look thick enough to be jumprings. (Tip: Hold down shift while drawing with the ellipse tool to get perfect circles. Draw one circle then copy and paste as a vector selection to make the other.)

Create a new vector layer and move the two rings to one of them, leaving the ellipse on the other. Convert both vector layers to raster.
Place the rings layer at the bottom of the stack and the clasp layer on top of the rings.
Use blade pro on the clasp and rings or do the following two effects.
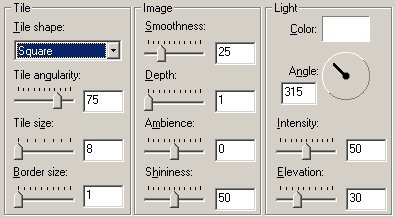
On the clasp layer apply Effects > Texture Effects > Tiles with these settings:
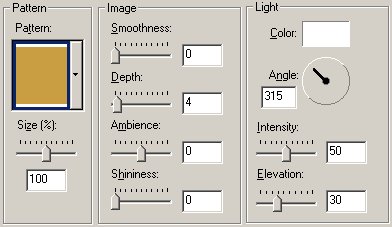
On both the clasp and ring layers apply Effects > Texture Effects > Sculpture with these settings (seen also in the Embellished Beads tutorial):
If necessary, on the cord layer add a little bit of cord at the ends to go into the rings.
On the knot layer add knots at the rings.
Now all we need are drop shadows.
Go to the knots layer. Select all, then click on a knot with the magic wand to float them. Go to Selections > Defloat (ctrl-shift-f).
Create a new raster layer under the knot layer. Apply a drop shadow on this layer with both offsets to 2, the blur set to 10, the color black, and the opacity 100%.
Duplicate this shadow layer.
On the cord layer select all, float with the magic wand, and defloat. Go to Selections > Save to Alpha Channel and save as 'cord'.
Go to one of the shadow layers, invert the selection and press delete.
On the bead layer select all, float with the wand, defloat.
Go to the other shadow layer, invert the selection and press delete.
Turn off all layers but the two shadow layers. Merge visible. Turn on all layers.
Set the layer blend mode to 'luminance' and adjust the opacity to your taste.
Add a layer above the ring layer. Load the 'cord' selection and apply the same drop shadow as before.
Go to the clasp layer: select all, float, defloat as you did before.
On the shadow layer above the rings apply a drop shadow.
On the rings layer select all: float, defloat as before.
On the shadow layer above, invert the selection and press delete. Set the layer blend mode to 'luminance'.
As a final touch, go to the cord and knot layers and use Colors > Adjust > Hue/Saturation/Lightness to change the color of the cording to suit your beads.
Now you can merge visible layers and save as a tube if you wish.

As this image is there is no full drop shadow, making it more versatile. To drop shadow the image you will need to merge the visible layers first.