Vector Brandy Snifters 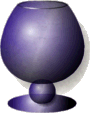
This tutorial uses vector shapes and assumes you are familiar with the styles and colors palette.
You will need the shape 'Button 066' from PSP7's 'Buttons 02.jsl' file.
If you want to be certain your gradients and nodes will line up with mine copy the 'Button 066' shape from 'Buttons 02.jsl' file and paste it into your new image with ctrl-g rather than using the shape tool and drawing it. With the vector tool right click and drag a corner to resize the shape. This will only work for the part based on this shape, items drawn with the vector shapes tool will have nodes in different locations. This will not effect your final product.
If you do not have this shape I have briefly described how to make the parts you need. When you have finished take the link at the bottom of the page to come back to the relevant parts of this tutorial.
Open a new image with a transparent background about 500x500 pixels or a size big enough for you to work with comfortably. Since we're working entirely with vectors the final image can be made any size with no loss of quality.
Choose the Button 066 shape, make sure 'retain style' and 'create as vector' are checked. Hold down the shift key and draw a large sphere in the center of your image.
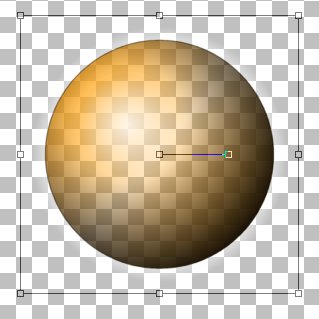 Now this shape
has a few things we need to adjust before we get started:
Now this shape
has a few things we need to adjust before we get started:
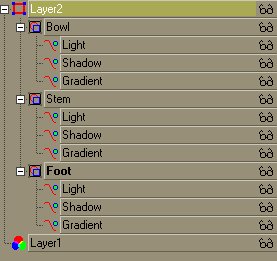
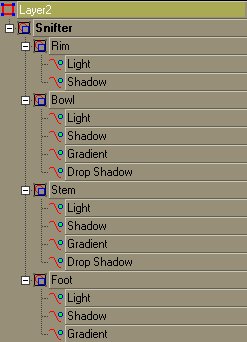
Go to the layer palette and delete the layer named 'glow' and the blank layer if you have it (I made some changes to my shapes file so you may not have this layer).
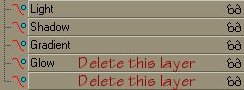
When you are done you should have just three layers, Light, Shadow, and Gradient.
Right click the Shadow layer and select 'Properties....' Change the stroke to nothing (circle with a line through it).
Now a few changes need to be made to the gradients fills to help this look like glass.
Right click the Gradient layer and select Properties.... Click on the gradient box and then change the angle to 110. If you wish, edit the gradient to change the color of your glass.
Right click on the Light layer and select Properties....
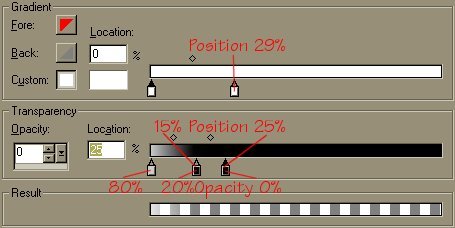
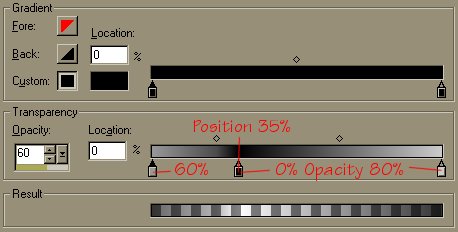
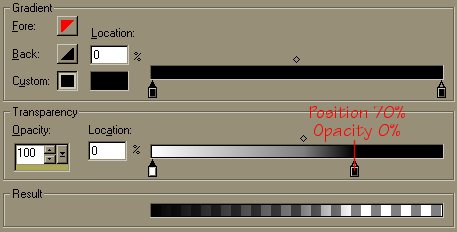
Click the gradient box and then the edit button so we can edit the gradient. Change the settings to match these:
Move the right hand color arrow to 29%
Move the right hand opacity arrow to 25% and set the opacity to 0%
Set the opacity of the left hand opacity arrow to 80%
Move the middle opacity arrow to 15% and set the opacity to 2%
Now that the shape is ready select all parts, copy (ctrl-c) and paste as a new vector selection (ctrl-g) twice.
Go to the layer palette and arrange and name the shapes like this:
Select the stem layer. Go to the image with the vector tool. Right click on one of the corner handles and drag it inward to shrink the stem sphere to something that looks reasonable.
Select the foot layer, in the image grab the center top handle and drag it down to flatten the shape.
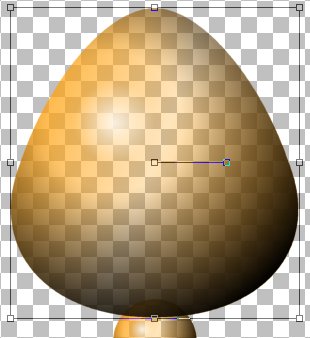
After arranging things a bit you should have something like this:

Select all layers/shapes and go to the tool option palette. Click the button
to vertically center all shapes. ![]()
Select the Bowl layer. Hold down the control key and drag on of the lower corner handles out, one of the upper corner handles in, and then release the control key and grab the center top handle and drag it up to create a shape like this:
Switch to the shapes tool and select the ellipse. Set the line width to 3, the fill to nothing, the stroke to a linear gradient, fading foreground.
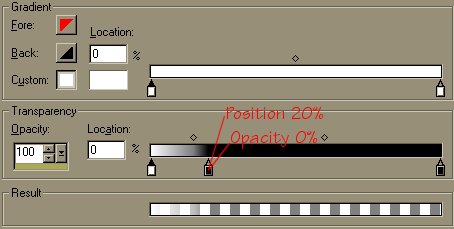
Draw an ellipse to be the rim of the snifter. Edit the properties so that the angle of the gradient is 135, repeats 0. Then edit the gradient to match this:
Copy the ellipse and paste as a new vector selection and arrange it exactly on top of the original. Circular gradient, horizontal 30, vertical 100, repeats 0, then edit the gradient to match this:
Now to edit the bowl to match the rim shape.
Select the Bowl gradient layer. With the vector tool ![]() right click the image and select node edit.
right click the image and select node edit.
Hold down the control key and click where the outline of the shape crosses the rim ellipse to add a point. Add one on the other side as well.
Release the control key and drag a box around both new points and right click, select the node type 'cusp'.
Select the top node and set the node type to 'symmetric'. Drag it down to the rim ellipse and adjust the handles of each side point so the line of the shape is in the center of the line of the ellipse like this:
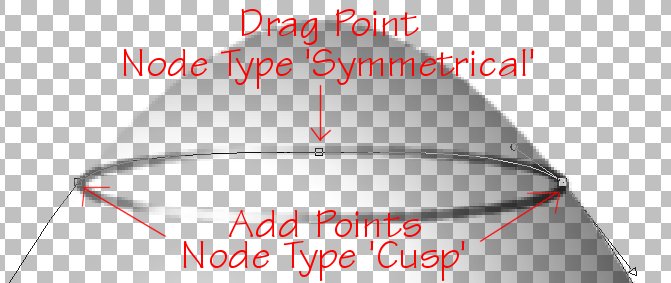
Right click and select 'quit node editing.
Do the same steps on the Bowl's shadow layer and light layer.
You should now have something like this:

Now we need to deform the stem a bit to make it look like it actually connects the bowl and foot. To do this we're going to flatten the top and bottom slightly without changing the sides. Start by selecting the stem's gradient layer.
Enter node editing and add points where the stem intersects the bowl. Make two more nodes in line with these on the bottom half of the circle too. Make the four new nodes all 'cusp' and drag the center top and bottom nodes to flatten out the shape a bit.
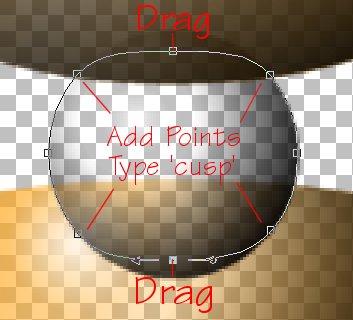
Do the same for the shadow and light layers.
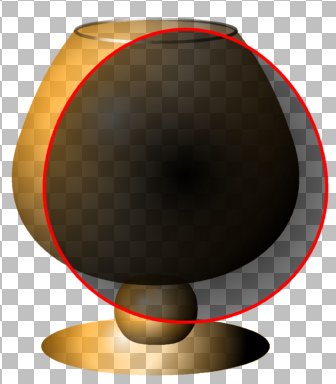
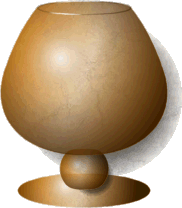
At this point the Snifter is basically done. But if you look closely at the sample at the top of the page there's a shadow. That is also done with vectors.
Change to the shapes tool. Select the ellipse. Set stroke to nothing and fill to circular gradient.
Drawn an ellipse that intersects the bowl of the snifter at the lower left curve and high on the right near the rim like this (shown with a red edge to show placement) If necessary narrow the top of the ellipse to echo the shape of the bowl:
Node edit this ellipse, adding points where it crosses the edge of the bowl (type 'cusp) and then arranging the points to follow the line of the bowl.
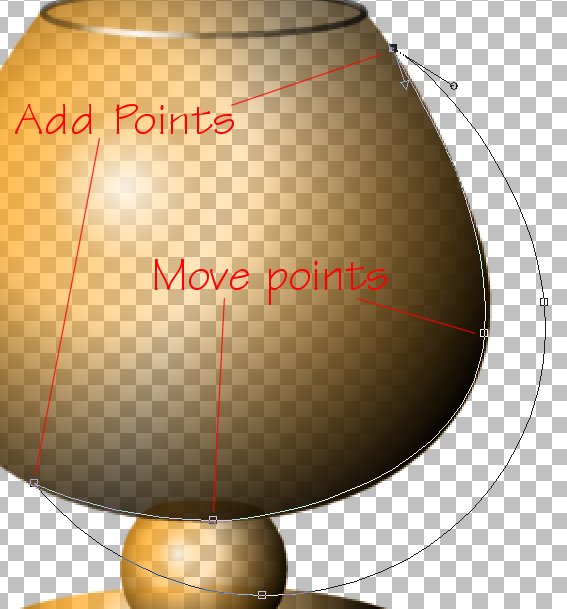
Now edit the gradient like the image below. The center of the circular gradient should be around 50, 50 but you will have to adjust it for the particular shape of your snifter. In my case I had to use horizontal 45 and vertical 50 for this snifter.
Create a shadow for the stem in the same way. Unfortunately I wasn't able to work out how to make a shadow for the foot so that would have to be created as a raster shadow each time you used the snifter.
 As a final
touch, select both rim ellipses and group them.
As a final
touch, select both rim ellipses and group them.
Select all groups and group them together.
Name the assorted layers and groups like the image to the right and then export the shape to use as a preset.
Finally, adjust the colors of different parts to suit your taste. I thought the yellow as a bit bright so I chose a more amber color. I also thought the black shadow was a bit dark so I made it dark brown instead.
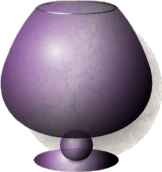
For the lavendar shifter I not only changed the color but selected the rim and bowl parts and deformed them to make bowl of the snifter larger.
The nice thing about Vectors are these changes are really simple to make and don't cost you any image quality. Do note that if you make the Snifter smaller you will have to thin the rim (and if you make it larger you may have to thicken it).
Tutorial Index
©2001 Lynn A. Davis